Brief overview of what Docker networking is and its significance
In the world of Docker, deploying a container is not simple; properly configuring a container architecture requires strong networking capabilities. A web application with a cluster of databases, applications, and load balancers spanning numerous containers that need to communicate with one another would have a different network architecture than one designed to run on a single Docker container.
The web application container will also need to be accessed by clients from the outside world. To facilitate this, Docker allows communication between Docker containers on the same or different machines and with external resources through the virtual Docker network. You can create complex, scalable, and secure systems using containers by employing multiple network drivers to meet your needs, whether you want to isolate your containers, connect them across hosts, or integrate them with existing networks.
Steps we'll cover in this tutorial:
- Brief overview of what Docker networking is and its significance
- Docker's Default Networks
- Bridge Networking
- Host Networking
- Overlay Networking
- Macvlan Networking
- Custom Bridge Networks
- Networking Tools and Commands
Docker's Default Networks
Three network drivers/interfaces with different use cases are automatically created for you when you install Docker:
Bridge (docker0)
A container connects to this network when it starts running without specifying a network. Containers connected to the bridge network are given an internal IP address to communicate with each other.
Host
A container shares the networking namespace of the host when using the host network mode. As a result, the host's IP address and port will be used by the container to isolate and execute the process directly on the host.
None
As the name indicates, this mode disables the networking stack of the container. The host, other containers, and external systems are all inaccessible to containers running without network. It becomes useful when you do not require any network connectivity or complete isolation.
To view all networks, including the default ones, you can use the command:
docker network ls
The above command will return the following output:

Bridge Networking
Bridge networking is Docker's default mode. When a container is built without specifying a network driver, it's automatically attached to the bridge network, known for its ease of creation, management, and troubleshooting. Each container on this network receives a unique IP address, typically from a default range set by Docker. These containers can communicate with one another using their private IP addresses. Although bridged to the host system, allowing them to communicate with the LAN and internet, they aren't visible as physical devices on the LAN. External communication is routed via Network Address Translation (NAT) on the host. To make containers externally accessible, port mapping is Important. For example, a container running a web service on port 80, situated within the bridge network's private subnet, requires a mapping from a host system port (e.g., 8000) to the container's port 80. This enables external traffic to access the service.
You can specify a container to create in a bridge network by executing the following command:
docker run --network=bridge [IMAGE_NAME]
The above command will return the following output:

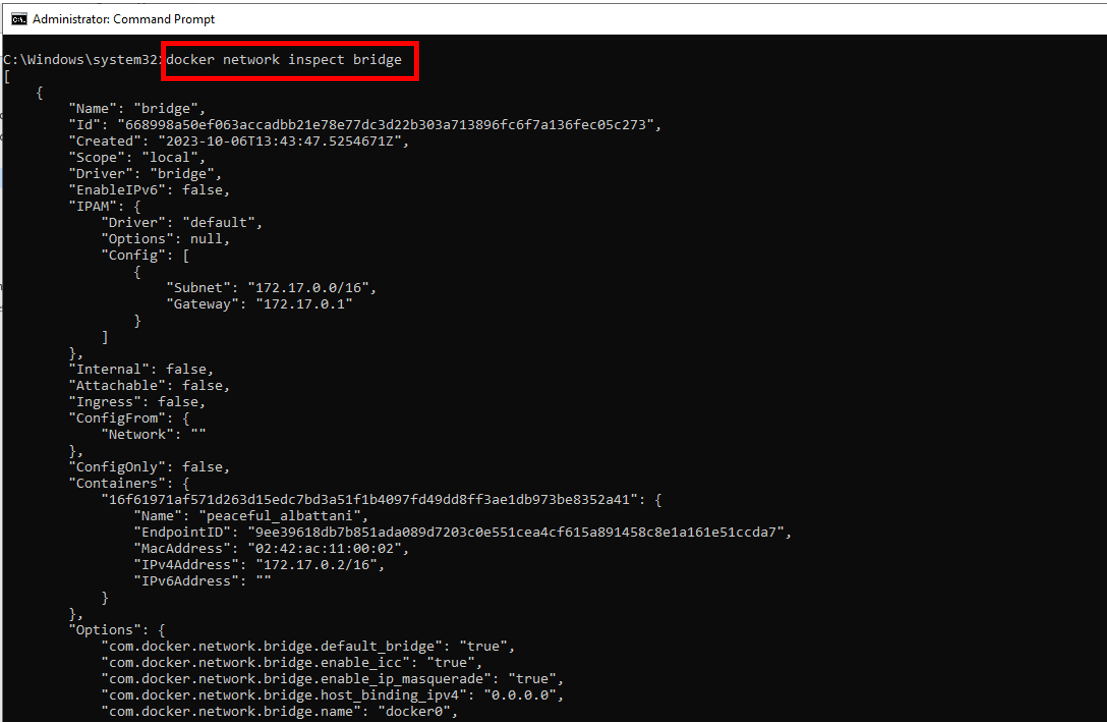
Now, if you want to see which containers are in the bridge network and the details related to them, you can run the following command:
docker network inspect bridge
The above command will return the following output:
Host Networking
In Host Networking, the host drivers utilize the networking capabilities of the host machine. This mode removes the network isolation between the host computer (on which Docker is running) and the container. With Host Networking, Network Address Translation (NAT) is not required, and this simplifies the management of multiple ports simultaneously.
Let's suppose there is a scenario where port 8000 is published by a container using the host network; that port will also be published on the host system. As a result, the application running in a container that uses host networking and binds to port 80 is accessible via port 80 of the host's IP address. When running the container, we can use the --network flag with the value set to host in order to create a Docker container that uses the host network mode.
docker run --network=host -d [Image_Name]
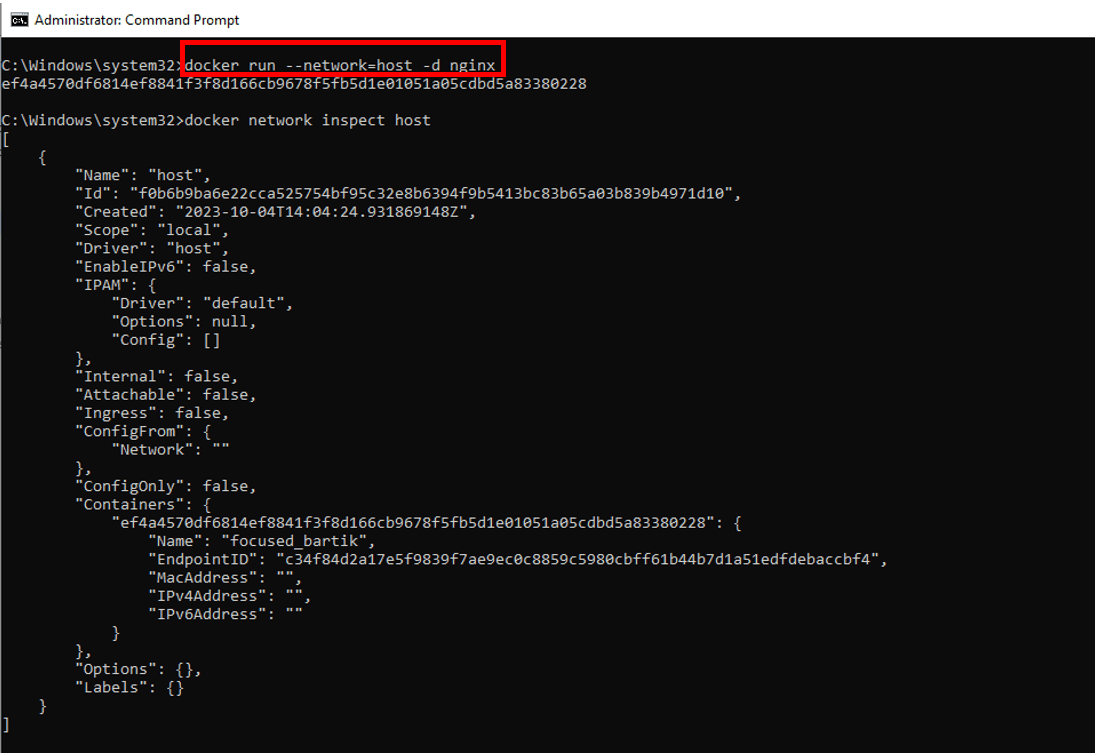
Here's how we can create an Nginx container using host networking:
docker run --network=host -d nginx
The above command will show the following output:
Overlay Networking
For multi-host network communication, like with Docker Swarm, the Overlay network can be utilized because it is a distributed network layer that makes it easier for nodes and services to communicate with one another. Overlay networking enables connected containers to communicate throughout the swarm securely and efficiently. Swarm services or standalone containers may utilize overlay networks built and controlled by the swarm manager.
You can either initialize your Docker daemon as a swarm manager using docker swarm init or join it to an existing swarm using docker swarm join to build an overlay network for use with swarm services. Let's suppose we want to create/setup a custom overlay; for that purpose, we can use the following command:
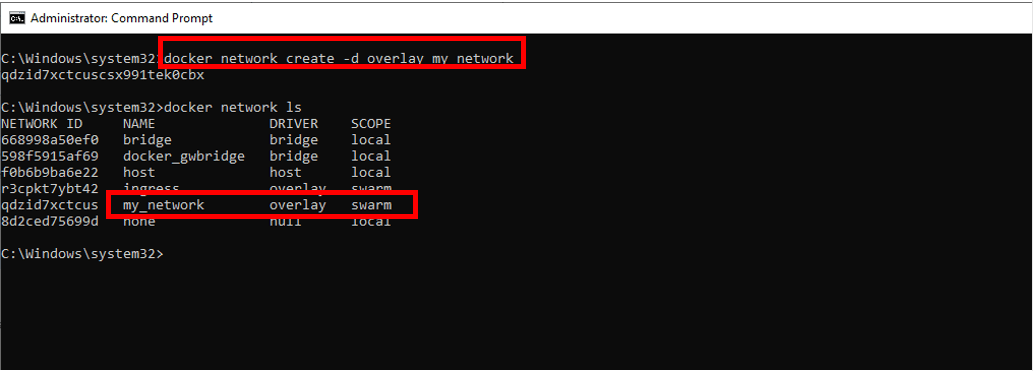
docker network create -d overlay [NETWORK_NAME]
The output shows that by running the command above, we have created an overlay network with the name 'my_network':
You can connect Docker services to the overlay network once it has been set up, enabling service-to-service communication among multiple Swarm nodes. You can use the command below with the '—network' option to build a service and attach it to the overlay network:
docker service create --network=[NETWORK_NAME] [SERVICE_OPTIONS] [IMAGE_NAME]
Let's say that we want to attach the 'nginx' service to 'my_network'. In order to achieve that purpose, we can replace [NETWORK_NAME] with 'my_network' and [IMAGE_NAME] with 'nginx' in the command above. We can also add [SERVICE_OPTIONS] like '—name' or '-p' to assign the name or port to the service while attaching it to the network.
docker service create --name nginx-service --network my_network -p 80:80 nginx
The below output shows that the 'nginx' service has been attached to 'my_network':

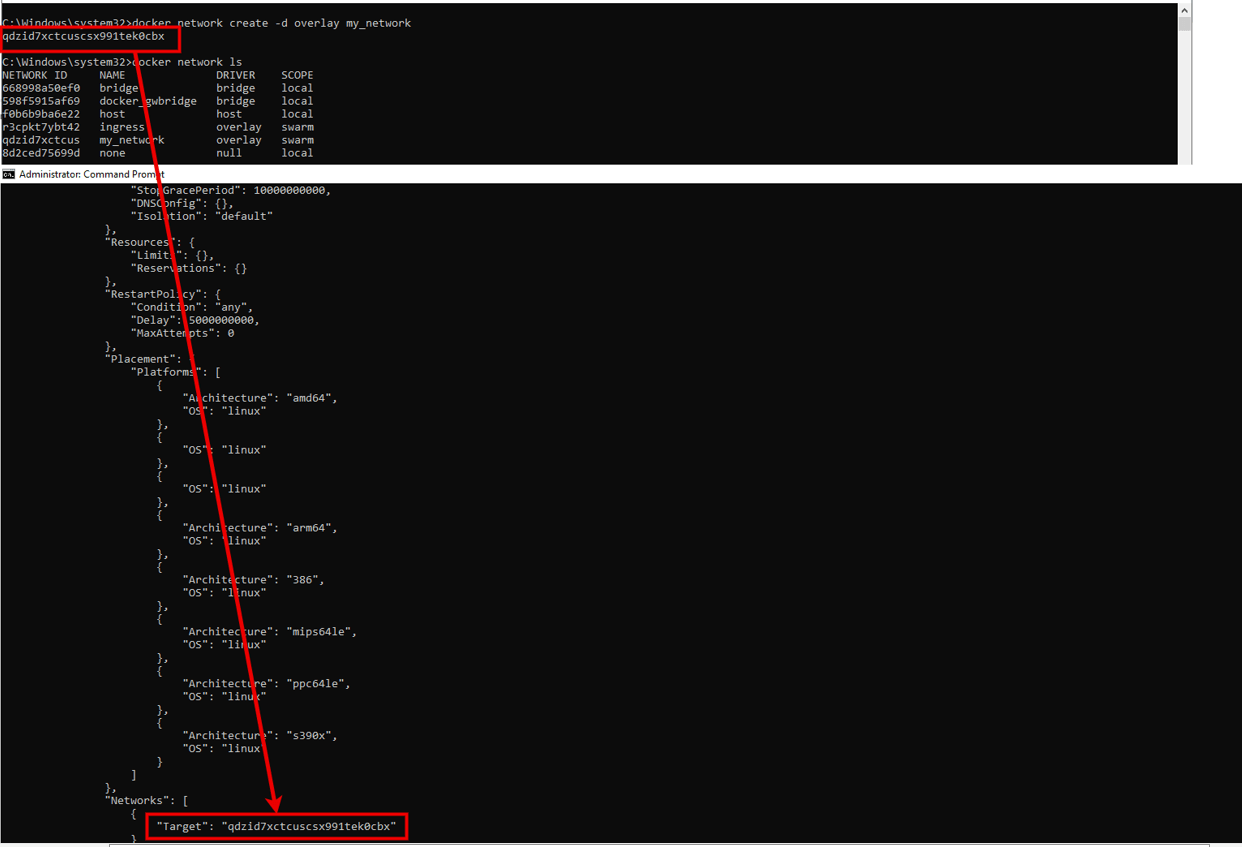
When we inspect the service 'nginx-service', it will show the information about the networks that are attached to this service. This will verify that we have successfully attached our service to the overlay network. Please see the output below:
Macvlan Networking
The Macvlan network driver in Docker fills the gap between traditional network structures and container networking. Each container on the Macvlan network is given a unique MAC address, which makes it seem like an actual device on your network, much like a traditional virtual machine. The traffic is subsequently directed to containers based on their MAC addresses by the Docker daemon. Additionally, you will be able to assign an IP address from the same subnet as the Docker host.
We can create a Macvlan Network by using the following command:
docker network create -d macvlan [options] [name_of_network]
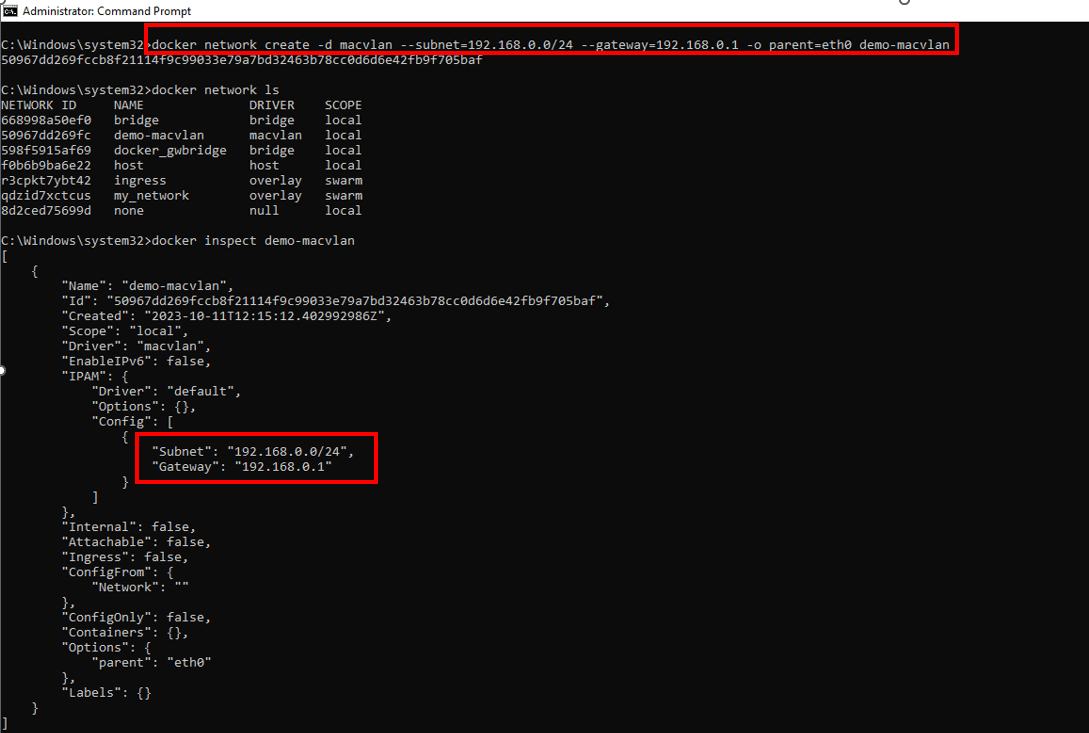
Let's say we want to define a subnet, gateway, and parent interface to set up a new Macvlan network called 'demo-macvlan'.In order to achieve our objective, we can utilize the command given below:
docker network create -d macvlan --subnet=192.168.0.0/24 --gateway=192.168.0.1 -o parent=eth0 demo-macvlan
The output below demonstrates that the new 'demo-macvlan' network is set up with the subnet '192.168.0.0/24' gateway '192.168.0.1' and parent interface 'eth0'. Specifying 'eth0' as the parent interface indicates that the Macvlan network will use the physical network interface eth0 of the Docker host to connect to the external network:
Custom Bridge Networks
You can build isolated, safe networks for containers with the help of custom bridge networks. It will allow you to determine DNS resolution across containers by name or alias while at the same time giving you control of networking configurations such as subnets, gateway and IP addresses. You can make use of the docker network create command with the option '-d' when you want to set up your custom bridge network. The name of the network also needs to be specified.
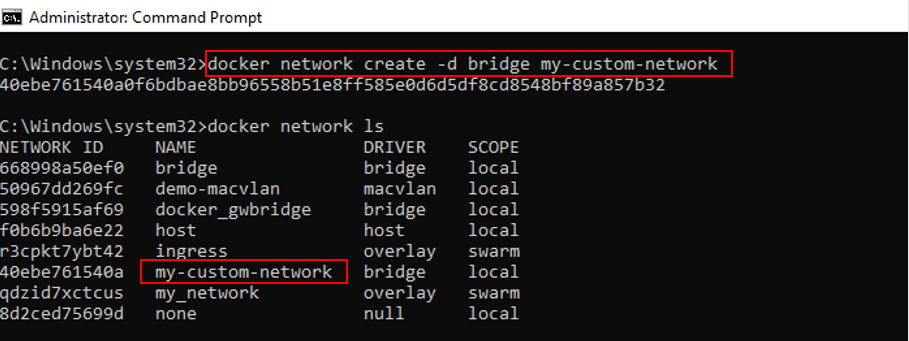
Suppose if we want to set up a custom bridge network with the name 'my-custom-network', we can run the command below:
docker network create -d bridge my-custom-network
The above command will return the following output:
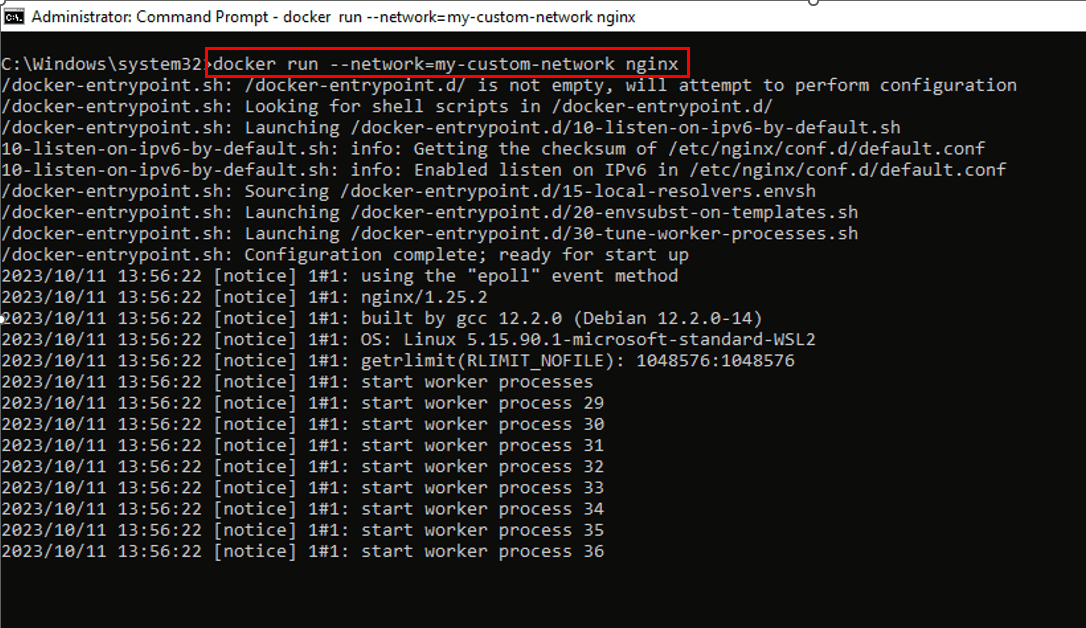
We can use the '—network' option of a docker run command to connect containers to this custom network. For example, we can run the command below if we want to start an 'nginx' container and connect it to 'my-custom-network', i.e., a custom bridge network that we created above:
docker run --network=my-custom-network nginx
The above command will return the following output:
Networking Tools and Commands
The Docker system offers a number of networking tools and commands that facilitate container network management, inspection or troubleshooting. The docker network inspect is a very useful command, which shows detailed information about the specified network, including connection containers, IP addresses and network settings. For example, you can use the following command to see all information related to the 'my-network':
docker network inspect my-network
Using 'docker network connect' or 'docker network disconnect', you can connect and disconnect existing containers from a network. Also, if you want to test the connectivity between two hosts, you can use 'ping' to send packets between them and measure response time. For example, if you want to test the container's ability to access the external site, you can run the command 'ping google.com' inside the container shell.
Conclusion and Best Practices
To ensure efficient communication of containers and their integration with wider infrastructure, Docker networking plays an essential role. The system's flexibility enables it to be configured according to specific needs. The following should be taken into consideration when selecting a network type:
- In the Single Host Setups, you can build custom bridge networks to improve network isolation.
- Overlaying networks are necessary to manage multiple nodes in an orchestration with Docker Swarm.
- Macvlan is appropriate for when containers must physically appear on a network.
- The best performance is offered by the host network, but it sacrifices isolation.

